
Elderbow are the flowers of the Blue elderberry tree. We collected them from the wild and cleaned them up so that there was as little stem as possible while leaving them in small clusters of flowers. Please do not collect from the wild without properly identifying the plant you are using, as it can be dangerous.
This recipe comes from Dr. John Kallas, who runs Wild Food Adventures.
Dry ingredients:
2 C all-purpose flour
6 Tbsp brown sugar
1 Tbsp baking powder
1 tsp salt
- Blend well and set aside.
Wet Ingredients:
4 large eggs, well beaten
3/8 C olive oil
1 Tbsp vanilla extract
1 tsp rum extract
2 C 1% milk
- Gradually beat olive oil into eggs until well beaten.
- Add vanilla and rum extracts.
- Gradually beat in to mixture.
- Stir dry ingredients, gradually adding liquid. Don’t over stir!
- Decompress and gradually fold in 1.5 C compressed elderbow flowers.
- Let rest for 3 minutes.
- If too thick, gradually add up to 1/2 C milk.
- Oil griddle liberally.
- Ladle batter and make 5″ pancakes.
- When light golden brown, flip and cook the other side. Do not press flat.
- Increase or decrease heat as necessary (cooking too slowly will dry them out, and cooking too quickly will burn them).
- Place finished pancakes in a warm container until served, covered with a towel to keep moisture in.
- Serve sprinkled with powdered sugar.
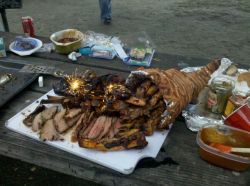
With the weather starting to feel like fall, we thought a cornucopia would be in order for the birthday BBQ. But how about a bacon cornucopia? A bacon cornucopia… Such gluttony! How could we resist. And so, the bacon cornucopia was born…

Bacon cornucopia, with ribs and tri-tip spilling out. Oh, and sparklers for good measure.
Supplies:
chicken wire, about 2′ x 2′
cotton or hemp twine
scissors you don’t mind ouching by cutting chicken wire
4 lb bacon
1/2 box toothpicks
aluminum foil
cookie sheet with taller edges
cookie drying rack or other rack that the bacon cornucopia can cook on
oven
Instructions on How to Make a Bacon Cornucopia:
1) Cut chicken wire into a square with a rounded edge. I found it easiest to fold it together into the shape of a horn and cut it like that. You’ll want one edge of the cornucopia lip to be shorter than the other. The longer edge will be where the goodies spill out.

How to make a bacon cornucopia step 1: Cut chicken wire. Note: we ended up cutting about 8" off our cornucopia as we were building it. The bacon was so heavy that it wasn't wrapping properly. I would suggest no more than 18" from the most protruding lip of the cornucopia to the tip.
2) Fold chicken wire into a horn shape and use your twine to string it shut.

How to make a bacon cornucopia step 2: String it shut
3) Being careful not to poke yourself on the chicken wire, bend the wire into a horn shape, keeping in mind that the horn tip should point up and the longer edge lip should be the base of the cornucopia.

How to make a bacon cornucopia step 3: Bend wire into cornucopia shape
4) Wash well with soap and water to ensure and debris and dust are cleaned off. Dry.
5) Wrap horn with aluminum foil.
6) Preheat oven to 325 degrees Fahrenheit.
7) Open four packs of bacon and separate the slices to make them easy to grab individually as you build your horn.
8) Start wrapping at the tip. Make sure that as you wrap, you are overlapping the bacon by half, as the bacon will shrink. Use toothpicks to hold the bacon in place.

How to make a bacon cornucopia step 8: Start wrapping bacon at the tip.
9) Continue wrapping all the way up. As the bacon warms up, it may start to loosen. Use more toothpicks. I had considered wrapping it in cotton twine as well, but only had hemp (hemp would leave small threads behind, so I opted to continue with toothpicks).
10) Wrap thickly all the way to the lip edge. Due to the weight of the bacon, rotating the bacon cornucopia toward the end became difficult. I ended up picking up the bacon and wearing it like a meat puppet on my hand, and continuing to wrap bacon slices around.
11) For the cornucopia lip, fold slices of bacon in a zig zag pattern, poking tooth picks through both sides (through bacon, wire skeleton, and bacon again) to hold it into place.

How to make a bacon cornucopia step 11: Wrap the lip of the bacon cornucopia
12) When your cornucopia is all wrapped up in bacon, you’re set to go! Put it in the oven (325 degrees) for 30 minutes, laying on its side so that the pointed tip of the cornucopia is pointing sideways.

How to make a bacon cornucopia step 12: Ready, Set, Bake!
13) At 30 minutes, gently flip cornucopia over. Make sure you’ve stabilized it with a tool inside the bacon cornucopia as well as using something to hold the bacon in place on the outside. Be careful of the tip.

How to make a bacon cornucopia step 13: Flip the bacon cornucopia.
14) Bake at 325 degrees for another 30 minutes. Your cornucopia is almost done!
15) Let bacon cornucopia rest for 3-5 minute, then gently remove and discard toothpicks. You do not want to wait too long for this step, or removing the toothpicks will break the bacon. Do this while the bacon is still somewhat soft and warm.

How to make a bacon cornucopia step 15: Remove toothpicks. Note: As you can see, I did a terrible job of taking my own advice. Layer your bacon well to prevent gaps and aluminum foil showing through.
16) Allow to cool completely and carefully move to platter where you will be serving. Add plentiful grilled meats, vegetables, or whatever else you’d like pouring out of your bacon cornucopia.
Bacon cornucopia - Final Product (though little potluck gremlins had already started nibbling at the bacon around the edges of the cornucopia).
17) Revel in your bacon cornucopia gluttony. The “WOW” factor of this centerpiece is well worth it, but you may never want to eat bacon again after this. You have been warned.
Bacon is one of the ultimate anti-me foods… to find out what’s been cooking in my Low Amine kitchen lately, check out my primary blog, Low Amine Recipes (http://aminerecipes.com).
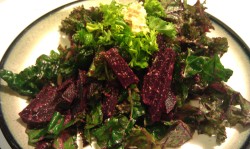
Serves six to eight hungry salad-eaters.
2/3 bunch curly (red or green) kale
2/3 bunch dino kale
6 medium sized beets (2″ diameter), golden beets or red beets
1 nectarine, pit removed
1/4 C balsamic
1/4 C olive oil
1/2 tsp dried marjoram
1/2″ nub of fresh ginger
1/4 yellow onion, sliced thin
1/3 C chopped cilantro
pinch salt
generous amount fresh ground black pepper, to taste

Six beets, with lighter for size proportions
- Wash and trim up root and greens end of beets. If you keep the beet tops (stalks and leaves), they’re delicious used later in any chard recipe.
- Add beets to a pot. Heat till boiling, then lower to a simmer. Cook until just tender and “forkable” (easy to run through with a fork).
- Wash kale and remove ribs (easily done with a “squeegie” motion). If you save the ribs, you can saute, bake them (with liquids), or use them in stock later.
- Put kale leaves in a large bowl and pour in half the oil.
- Using a kneading motion, massage kale and oil together until kale cellular structure is broken down and kale is easily chewed. It should still have some toughness to it, but generally is much more tender than the beginning state.
- Take kale leaves and cut into slim slices, as ribbonlike as possible. Put back in bowl.
- Drain beets when done and allow to cool.
- Cut beets into thick matchsticks add to kale. Do not add to kale until they are cool, to avoid the kale cooking.

Beets and massaged kale in a large salad bowl
- Chop ginger into small slices.
- In a food processor, add chunks of nectarine and ginger. Puree until smooth. If it needs liquids to keep it going, add some of the balsamic vinegar.
- Add in balsamic, remaining oil, salt, pepper, and marjoram. Mix until thoroughly pureed.
- Toss nectarine dressing into salad, mix well, and serve. Salad keeps well for a couple days in the fridge.

Kale and beet salad, plated.
I just have to share a link to this fabulous article in the New York Times about using your foods effectively. It has always amazed me how much people throw away in food waste when they can utilize it as food product instead. This article really brought key issues, as well as tips and tricks, to the forefront.

BBQ Turkey Stuffed Cabbage
PMS leads to interesting food combinations. I was craving sloppy joes and ribs. I wanted both, desperately. But how to combine them and keep it relatively healthy? Solution: BBQ Turkey Stuffed Cabbage.
The jury is out on whether these are ghetto PMS food or totally awesome, but everyone that tried them was in love with them. But maybe they were PMS’ing, too… Either way, they’re tasty!
2 lbs ground turkey
1 large yellow onion
5 Tbsp garlic powder
1/2 C parsley
1 large head cabbage
2 Tbsp fresh ground pepper
3 Tbsp crushed red pepper (or more, if you like it hot)
1 tsp salt
1 egg
1/2 C fat free cream cheese
1/2 C garlic breadcrumbs
1/4 C red wine vinegar
Bottle of your favorite BBQ sauce
- Preheat oven to 350 degrees.
- Boil a pot of water large enough to dunk the entire head of cabbage.
- Cut out core of cabbage with a paring knife.
- When water is hot, put cabbage in and using tongs, peel away layers as they cook and become pliable. Set leaves on a separate plate to cool. Save center ball of cabbage and use those leaves to line the bottom of a large (lasagna sized) Pyrex pan.
- Chop onion and saute until lightly caramelized. Add red wine and garlic powder, mix, and remove from heat.
- In a large bowl, add turkey, parsley, ground pepper, red pepper, salt, cream cheese, garlic breadcrumbs, egg, and half the bottle (or about 3/4 C) BBQ sauce.
- Once onion mix has cooled enough that you can handle, mix together well with other ingredients (I use my hands).
- Peel apart center ball of cabbage and use small leaves to line bottom of Pyrex.
- Wrap about 1/2 C of turkey mix into each cabbage leaf, folding in the end and setting in pan seam-side down.
- Set them in fairly snugly so they support each other and don’t fall apart during cooking. You should have two long rows of BBQ stuffed cabbage in the tray.
- If there is leftover turkey, you can create meatballs and toss them on top of the tray of cabbage. They’ll cook and taste fine.
- Pour a thick strip of BBQ sauce over each row, cover in foil, and bake for 50 minutes.
- Uncover and cook for another 10-15 minutes, then remove and cool on the stove top for 5 minutes.
- Once cooled, add another strip of BBQ sauce, then scoop out individual stuffed cabbage packets with a slotted spoon.

Barbecue Turkey Stuffed Cabbage
1/4 C balsamic vinegar
3 Tbsp Grapeseed oil (or olive oil)
6 cloves garlic
- Pour oil and vinegar into a cup.
- In a mini food processor, grind up garlic.
- Add a little of the oil and balsamic vinegar to the food processor. Either use a spatula to clean chunks of garlic, or be lazy like me and shake the machine.
- Run until all garlic is pureed. Add in remaining oil and balsamic vinegar and puree until dressing gets a creamy consistency.
- Pour into salad and toss gently. It should easily dress a salad big enough for 6 or 8 people.
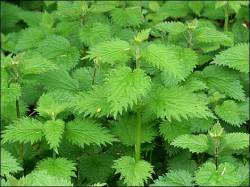
Stinging Nettles are delicious, and extremely good for you. Not only are they high in antioxidants, but are the plant highest in protein. It’s no wonder that Stinging Nettles developed the weapons that are their namesake. When you gather nettles, be sure you’re doing it in an area low in pollution and somewhere that isn’t sprayed. You don’t want to eat those chemicals.
Though Stinging nettles can be replaced in most any recipe that calls for cooked spinach, nettle soup is an easy way to get acquainted with their flavor. The nettle soup recipe below is simple, quick, and easy. The hard part is in gathering. Use caution, and gloves!
1 lb nettle tips (or about a 3/4 loosely packed paper grocery bag)
2 C milk (or soy milk, rice milk, or vegetable stock)
1/4 C rice
1 large Walla Walla sweet onion
2 tsp freshly ground black pepper
2 tsp salt
2 Tbsp grapeseed oil (or olive oil / canola oil)
3 Tbsp bacon grease (I save mine when I make bacon and store it in the fridge till I need it), or two strips cooked, crumbled bacon plus grease.
1/2 tsp nutmeg
1 pinch ascorbic acid (or 1/2 tsp lemon juice or lime juice)
4 C vegetable, chicken, or beef stock
- Handle uncooked nettles with gloves and caution. They’re not called stinging nettles without good reason.
- Bring a large pot of water to boil, and throw in the nettles. Blanche for one minute, then drain. Rinse. You should be able to touch them without getting nettle stings now.
- Roughly chop onion. Add it with the grapeseed oil to the pot and caramelize. Add rice.
- Chop nettles and add to pot.
- Add spices (pepper, salt, nutmeg, ascorbic acid/lemon juice), bacon, 4C stock, and bring to a boil, then reduce to a low simmer.
- Cover, and simmer for about 15 minutes, or until rice is tender.
- Puree soup.
- Add remaining 2C liquid (milk, cream, or stock), and bring up to temperature.
- Serve, garnished with a swirl of cream, a dollop of sour cream, or sprig of parsley.
I was astounded at how easy it was to make chicken this time. I used a ceramic baking dish with a glass lid and went to town. The chicken was light, tender, and would have gone with a whole range of flavors. I didn’t measure the ingredients as I made it, so the measurements are estimations. Do what feels right for you.
6 chicken thighs, skin and extra fat removed.
1 C Mae Plo Thai Sweet Chili Sauce
2/3 C lime juice
3 Tbsp soy sauce or tamari
1/4 C minced garlic
1 C chopped cilantro
- Preheat oven to 400 degrees.
- Remove fat and skin from chicken.
- Pour chili sauce, lime juice, soy sauce / tamari over the top.
- Give each chicken thigh a proper layer of minced garlic on top
- Bake, covered for about 15 minutes.
- Uncover, and bake until the garlic starts browning (about 5-10 minutes).
- Add cilantro over the top, cover, and bake 5-10 more minutes, or until done (cut near the bone, and the meat shouldn’t have any pink rawness to it, and the juices should run clear).
- Enjoy!
How can something called “rosemary champagne turkey” NOT be good? That’s the real question. This is made to be served with the rosemary pomegranate sauce that is also published in my blog.
1 (12 – 15 lb) turkey, neck and giblets removed
1/2 cup butter, cubed.
1 apple, cored and coarsely chopped
1 onion, peeled and coarsely chopped
2 Tbsp garlic powder
2 Tbsp parsley
2 Tbsp dried sage
2 Tbsp lemon-thyme
1 Tbsp salt
1 Tbsp pepper
Leaves of 2 sprigs rosemary, minced finely
3 large sprigs rosemary, washed & intact
2 C champagne
1 C vegetable stock
2 – 3 Tbsp flour for gravy, if you so desire (gravy recipe not included)
- Preheat oven to 350 degrees.
- Rinse off turkey and pat dry very well.
- Rub turkey down with butter on the outside of the skin as well as underneath skin and in the cavity.
- Mix together garlic powder, sage, parsley, lemon-thyme, salt, pepper, and minced rosemary. Rub thoroughly into the skin of the turkey and in the cavity.
- Place apple, onion, and 3 sprigs rosemary inside cavity. Truss cavity shut and legs together.
- Set turkey in pan breast-side down. Pour 1 C champagne and the vegetable stock over the turkey and into the cavity. Cover turkey with a foil tent. Make sure the foil isn’t touching the turkey, if possible.
- Roast for an hour and a half (depending on size of turkey), basting often with champagne.
- Flip turkey to breast-side up. Pour the other half of the champagne over the turkey and into the cavity.
- Roast, covered for an additional hour. Juices should run mostly clear and should no be very pink at the bone.
- Uncover and roast for an additional 30 minutes to hour. Baste often.
- Melt a little butter or use oil and brush surface of the turkey with it. It will give it a nice brown color.
- Pull out when juices are clear and color is not pink at the bone. Internal temperature at thickest point is 180 degrees.
- Remove turkey, let cool, covered.
- Carve and serve with rosemary pomegranate sauce.
I thought to myself, “champagne turkey with rosemary pomegranate sauce!” Now finding a recipe for that was another matter. Couldn’t find anything like it. So I decided to create it. The ingredients themselves aren’t so complicated: Rosemary, Champagne, and Pomegranate… how hard can it be to make it into a Champagne turkey with Rosemary Pomegranate sauce?
3 Tbsp butter
1/4 C champagne
1 1/2 C pomegranate juice
1 small onion, pureed
1/2 Granny Smith or other tart apple, pureed
5 cloves garlic, finely minced
2 Tbsp raw sugar
1 Tbsp balsamic vinegar or sherry vinegar
Leaves of 3 sprigs fresh rosemary, chopped (makes about 1 1/4 Tbsp chopped rosemary, packed)
1/8 tsp freshly cracked coarse black pepper
1 tsp cornstarch
1 tsp pomegranate bits (optional)
- Melt the butter over medium heat and sweat onion, apple, and garlic until just tender, about two minutes. Add pepper. Set aside.
- Add cornstarch to pomegranate juice and dissolve completely.
- Add everything except the rosemary (including onion and garlic) to the pot and mix well.
- Raise temperature and reduce sauce slowly, working toward a medium-thick sauce consistency (about the consistency of a slightly thin gravy), about 5-10 minutes.
- When the consistency is about two to three minutes till finished, stir in rosemary.
- Plate beneath turkey or chicken, or drizzle over the top.
- Sprinkle juicy pomegranate seeds over the top (optional).
- Serve.
